

Harvesting and Preserving Wild Mushrooms

Foraging for wild foods, particularly fungi or mushrooms, has been a great experience for both me and my husband. We have a good friend who is a retired forester from the Bureau of Land Management where we live in Southern Oregon. When he started showing us about the mushrooms that he knew were edible, we were hooked. He showed us that there are many fungi that are easily identifiable and plentiful in the areas where we regularly hunt for deer and we discovered an entirely new way to fill our freezer and pantry!
This post is not meant to help you identify anything you find. Be sure to have a positive ID for anything you have foraged before consuming it. Some mushrooms can be deadly. Others, can be delicious and nutritious!
Step one: Find some delicious edible mushrooms


Finding mushrooms in the wild is something like going on the ultimate Easter egg hunt. We enjoy it immensely! There's nothing else like it. When you find a large mushroom or better yet a large group of them, it's so satisfying and exciting.
The first thing to be done after you have positively identified your find, is to carefully remove the fungi from the forest floor or wood that it is living on, taking care not to disturb the white mycelium it is growing from. I like to re-cover any of the mycelium with dirt or bark if it has become exposed.
Next, use a brush to clean away as much dirt and debris as you can. When working with mushrooms I know I have positively identified, I cut away the bottom of the stems as well before putting them into a mesh, paper bag or basket to carry them home in. It's a good idea to carry mushrooms in a container that has holes in it to allow spores to drop out onto the ground as you move about, hopefully starting a new patch of mushrooms in the future!
Cleaning the mushrooms of dirt and debris before leaving your foraging area will pay dividends when it's time to get down to the business of cleaning and preserving your harvest when you get home.
Step 2 : Clean up those mushrooms
The most efficient tools I have found for cleaning mushrooms are a toothbrush and water.
Many people do not like to use water to clean their mushrooms and I won't use any water to clean them until I'm ready to prepare them for cooking immediately or when I'm ready to preserve them. At that point I will use water as necessary. Mushrooms are mostly water and adding water will not harm them. Preparing mushrooms will always involve some method of removing the extra water so adding water while cleaning may make that process take a little longer but in most cases it's fairly minimal.
 MorchellaSoak them for 10-15 minutes in cool fresh water then rinse and scrub with a soft brush. I use a tooth brush to remove any further debris. Cut them in half and rinse again before placing them out to dry for a while. |  MorchellaAfter washing up, these Morel are drying out some before going into the freezer on a parchment lined sheet pan. After they are frozen they will keep in a freezer bag for months and can be used individually as needed. Cook thoroughly from frozen, do not thaw. |  Albutrellis Ellisii- Greening Goat's-foot FungusAn unusual and uncommon mushroom. We don't go looking for it but we are happy to partake if we find it! Delicious when sliced thinly and sautéed slowly for 30 minutes or more. I have frozen these and dehydrated them. They are quite large. |  Greening Goat's-foot FungusAfter cleaning up, drying out for a bit to be sliced thinly and either frozen or dehydrated. |  Oyster Mushrooms - Pleurotus ostreatusPleurotus ostreatus ready for the dehydrator. |
|---|---|---|---|---|
 Shrimp Russula - Russula xerampelinaRussula xerampelina - After a brief cleaning with water and a soft toothbrush. |  Shrimp Russula - Russula xerampelinaRussula xerampelina - Slicing for a sauté |  Shrimp Russula - Russula xerampelinaRussula xerampelina - After a quick cleaning in the field with a mushroom knife and brush. |  Giant funnel Mushrooms - Leucopaxillus giganteusLeucopaxillus giganteus - After a brief cleaning with water and a soft toothbrush. |  The haul after a day of foragingGetting ready to clean and preserve Bear's Head Tooth Fungus, Shaggy Manes, Honey Mushrooms, Chicken of the woods. |
 Cauliflower Mushroom - SparassisCauliflower Mushroom - Sparassis cut in half to begin the separating and cleaning process |  Cauliflower Mushroom - SparassisBroken down to begin the cleaning process - Cauliflower Mushroom - Sparassis |  Cauliflower Mushroom - SparassisCauliflower Mushroom - Sparassis after separating into smaller pieces and cleaning with water and a soft toothbrush. |  Cauliflower Mushroom - SparassisCauliflower Mushroom - Sparassis , broken into very small pieces and ready for the dehydrator. |  Chicken of the woods - LaetiporusChicken of the woods - Laetiporus after cleaning with water and a soft toothbrush, sliced and ready to be individually frozen then freezer bagged. |
 Armillaria - Ringed Honey MushroomsArmillaria - Ringed Honey Mushrooms separated and cleaned with water and a soft toothbrush. Note the peeled stems. These are ready for individual freezing then they will be freezer bagged for storage. |  Bear's Head Tooth Fungus - HericiumSeparated and cleaned with a toothbrush and water, they are then hand shredded and ready for freezing. They will be freezer bagged for storage. |  Bleeding Milk Cap - Lactarius rubrilacteusBleeding Milk Cap - Lactarius rubrilacteus is a delicious mushroom that bruises bright green then turns a normal mushroom tan color when cooked. I will sauté these then freeze together. When cooked before freezing they do not need to be cooked again before serving so they can be used immediately after thawing in the refrigerator. | 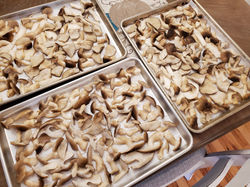 Lyophyllum decastes, Fried Chicken MushroomsFried Chicken Mushrooms - Lyophyllum decastes, separated from their clumps, cleaned with water and a soft toothbrush, cut into smaller pieces if some are large then placed on sheet pans lined with parchment paper to be frozen individually then later freezer bagged for storage. |  Chanterelles - Cantharellus californicusCantharellus californicus - we usually find these California chanterelles in the Southern Oregon Cascades but sometimes we find White Chanterelles as well. |
 Cantharellus californicus - Golden ChanterellesWash with water and tap lightly with a soft toothbrush to clean just before you are ready to cook or preserve. These will pull apart like string cheese to make smaller pieces. |  Cantharellus californicusCantharellus californicus - Golden Chanterelle cleaned before pulling or slicing. |  Cocorra - Amanita vernicoccoraAmanita vernicoccora - Do not eat these unless you have an expert identification. That said, they are an excellent choice mushroom you can find in the Spring. These have been cleaned removing some of the identifying aspects of this mushroom. They don't look like this when you find them. |  Cocorra - Amanita vernicoccoraAfter cleaning and chopping into manageable pieces, I freeze these individually then put them in a freezer bag for storage so I can remove just as many as I want to use at the time. |  Matsutake - Tricholoma magnivelareMatsutake - Pine Mushroom These mushrooms are very dense beautiful and tasty mushrooms! Don't wash until ready for use. I wrap them in foil and freeze them raw if preserving. Scrub them using water with a soft toothbrush or scrape them with a sharp knife to clean just before preparing them for cooking. |
 Shaggy Manes - Coprinus comatusShaggy Manes - Coprinus comatus are a quickly perishable fungi so I like to rinse them, slice or chop and sauté them as soon as I can. They will begin to turn black and melt into ink if they are not cooked soon after they are picked. After cooking they can be frozen and used later. |  Yellow Coral Mushrooms - Ramaria rasilisporaYellow Coral Mushrooms - Ramaria rasilispora are separated into florets and rinsed while tapping lightly with a soft toothbrush to remove debris just before preparing for cooking, freezing or dehydrating. |
There are many different shapes and sizes depending on the variety of fungi you might be preparing and they are all a bit different depending on their growing conditions as well. Some require only a light touch with minimal water and a light taping motion using a soft toothbrush to remove dirt and debris from crevices and gills. Others, require a more thorough breakdown before cleaning, especially when they are larger with many florets or when found in clumps.

Morels have a lot of crevices but they are completely hollow inside, lacking any chambers. I like to cut them in half and soak them in cool water for a few minutes then brush away any debris remaining with a soft toothbrush. Cook or preserve by freezing or dehydrating within a few hours. Morels are fairly hardy after washing but don't wait too long.


The mushrooms above are Lyophyllum decastes commonly known as Fried Chicken Mushrooms. Any mushroom that grows in clumps like these are handled differently. When in the field, I try to remove as much dirt, gravel and debris as I can from the clump leaving the mycelium under the clump as intact as possible. I set them tops up inside a bag or basket to carry home in an effort to keep the dirt from falling into the gills that are nearly pristine as long as they are kept upright. When I get them home, I don't touch them until I'm ready to cook or preserve them in some way. I turned these over in order to begin the process of cutting them apart toward the base of the stems so that I can clean and slice them with just a little water and my cleaning toothbrush. I clean each one and then set them aside to dry for a few minutes while I complete the task with as many as I need.

Above is a large Sparassis or Cauliflower Mushroom. There are many fungi that grow in a large coral shape with nooks and crannies everywhere. These require some breaking down before further cleaning and can seem a little intimidating at first. I'll go into that more in a link below.
This space is a work in progress
Not all of the links below are working yet but come back soon!
Here is a list of some of the many mushrooms that I have found and prepared for cooking, boiling, freezing, and dehydrating. Click on the names of the ones you'd like to know more about.
-
Boletes
-
Cocorra - Amanita vernicoccora
-
Chanterelles
-
Russula - Shrimp Russula, Short Stemmed Russula, Bleeding Milk Caps
-
Matsutake - Tricholoma magnivelare
-
Ganoderma Oregonense or Ganoderma lingzhi - Reishi
-
Matte Jack - Suillus Lakei
-
Cauliflower Mushrooms - Sparassis
-
Bear's Head Tooth Fungus - Hericium
-
Lyophyllum decastes - Fried Chicken Mushrooms
-
Coprinus comatus -Shaggy Manes
-
Amethyst Deceiver - Laccaria Amethystina
-
Armillaria - Honey Mushrooms
-
Leucopaxillus giganteus - Giant Funnel Mushroom
-
Albatrellus Ellisii - Greening Goats Foot